Best DIY Halloween Ghosts!
Halloween. That magical evening when gentle fall breezes tickle colorful leaves making them dance down the street while children in spooky costumes are outside bewitching their neighbors for tricks and treats. Inside, I’m watching Jamie Lee Curtis scream for her life in “Halloween” with all the lights off and candles in the window, pausing the movie only to answer the door for hungry visitors. For this year’s decorations, I made the best DIY Halloween Ghosts ever! I’m joining my blogging friends for Celebrations of Home to usher in the spooky holiday! Be sure to visit their Halloween projects (links at end of post).
I first saw these ghosts in Country Living magazine a couple of years ago and have always had it in my mind to make them.
 Then I saw them again on Facebook about a week ago when my friend Michelle posted a picture after making them with her young daughter. I asked her for the instructions so I wouldn’t have to go dig out my past issue of Country Living.
 Supplies you’ll need to make the ghosts are cheesecloth, balloons, liquid starch, black felt, scissors, and a hot glue gun (or other type of glue).
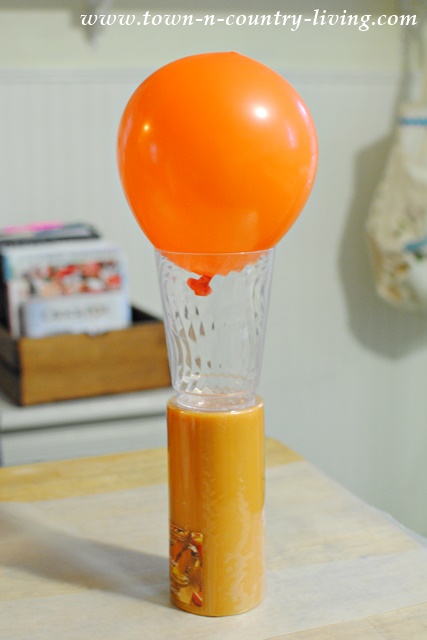 You’re going to drape the cheesecloth over the balloon, and you need a tower of sorts to allow the cloth to drape down. Line your table with waxed paper before building your tower. I used pillar candles I recently purchased for the base of my tower. Next comes a somewhat heavy glass to cradle the balloon. If you use a light glass, it will topple over when you drape the cheesecloth (I speak from experience!).
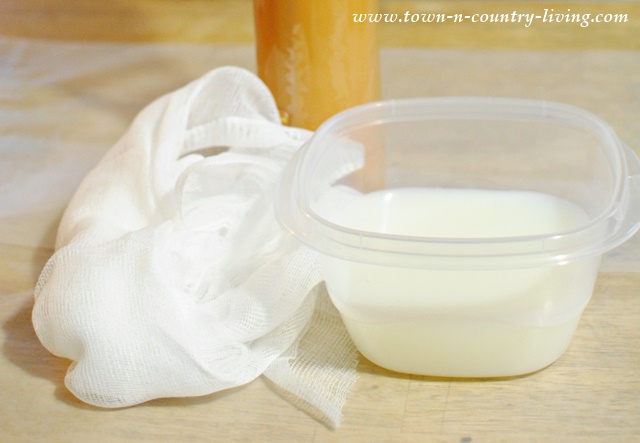 Pour the liquid starch into a plastic container. Drape the cheesecloth over the balloon and cut the cloth long enough so that it will puddle at the bottom. Next, submerge the cheesecloth completely in the starch, then wring out the excess. You don’t want it too dry, but you don’t want the cloth dripping all over.
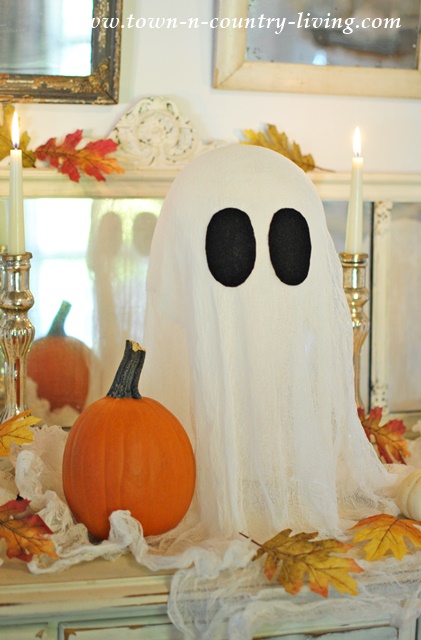
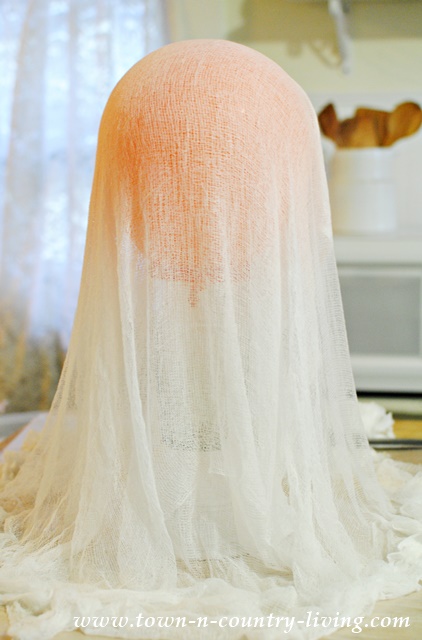 Drape the cheesecloth over your balloon (I used 2 layers of cloth for each ghost), and arrange the ends in a pleasantly puddling manner. Allow the fabric to dry overnight. Then remove the cloth gently from the balloon – or simply pop the balloon. Cut out large eyes from black felt and hot glue onto the ghost.
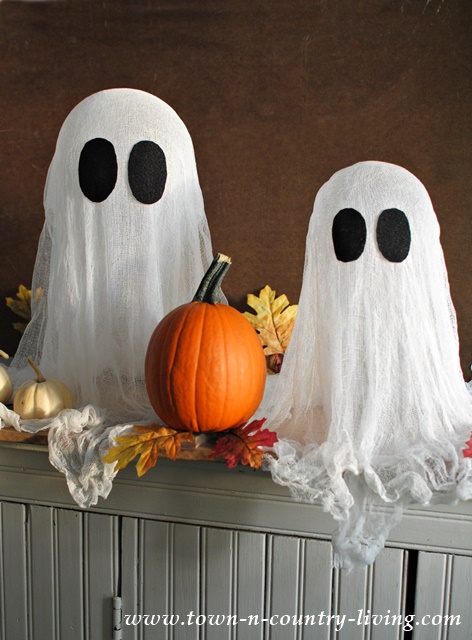
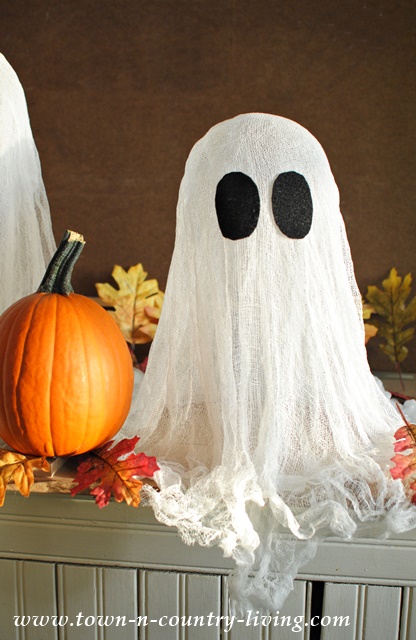
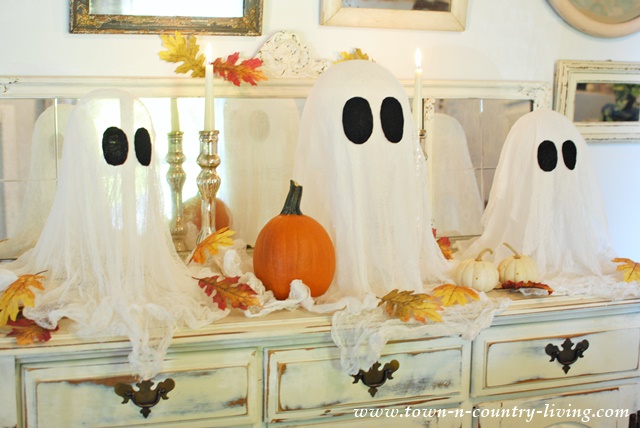 I arranged a few of the ghosts on the dining room buffet with leaves, candles, and little pumpkins.
 If you’re decorating with candles, make sure to keep them far enough away from the ghosts so they don’t catch on fire!
 I wasn’t home when my hubby first saw the ghosts. He sent me a text saying “Love the Ghosts!” He hardly ever texts me so I know he really liked them. These DIY Halloween Ghosts are so easy to make! I hope you’ll try them!
I had no clue these were as large as they are until I saw them on your buffet. I love that. I thought they were small but there are huge ghosties. 😀 I would love to make some of these with the grands, they would love the project and Grammy would hate the mess but oh well. 😀 *pinned and shared xxoo, Barb
Spooky and cute! I love these and I’ve always wanted to make them, too. You’ve inpsired me. And if you love Jamie Lee Curtis in Halloween, I hope you’re watching Scream Queens. It’s a campy send up of slasher films, and she’s in it.
Those are very cute, Jennifer! Hope I can find time to make some too!
Cyndee
Jennifer – these are the cutest things ever! And they look like they would be so much fun to make!
such a spooktacular buffet! The accessories are perfect, especially the candlesticks. Nice job, Jennifer.
Oh my goodness…I LOVE those! And what makes them really great is the mirror behind them…they look super transparent and ghostly! Hugs…Debbie
Hi,
I just thought I would send a quick note of thanks. I came across one of your great Halloween crafts and have used it in my Halloween craft ideas round up (with a link to you of course!) on my new blog.
If you would like to check it out, jump on over and see!
http://www.creativelycrafting.com/halloween-craft-ideas/
These are super cute. I love how they are Halloween themed and not too scary.
Great idea! Would these do well if put outdoors?
Hi Laurie!
I haven’t used these outside. I’m not sure how they would stand up to the elements. It might be worth a try to place just one outside and see what happens.
I think they will get soggy or soft from the mist in the air. I made mine outdoors and left them on the table to dry over night. In morning they were too soft. So i left them out all day. Later i checked and they were nice and firm. I did not bring them indoors until 10 pm and they were soft again. I live in Calif and its still in the 90’s by day and high 60’s at night. But there is moisture in the air. I guess that is what made them soft. I made mine with glue/water mixture. I also did not open my cheese cloth all the way and it has seams. I will open all the way next time.